What is Keene Castle?


Lance Keene
CEO | Keene Systems, Inc.
A web development firm

Having lived in Germany while in the Army, I was inspired to build a castle. In 1998 I did Tony Robbins' goal setting workshop. I set 3 goals: 1. Move back to New Hampshire, 2. Marry the woman of my dreams & start a family, 3. Build my dream home, a castle. The castle soon became a source of inspiration, not just for achieving one's goals in life but also to teach people about climate change, global warming, green energy production and green building. As a science nerd and an artist, this off-the-grid castle is my lifelong science and art project now in its 23rd build season. The castle will produce all its own energy needs:


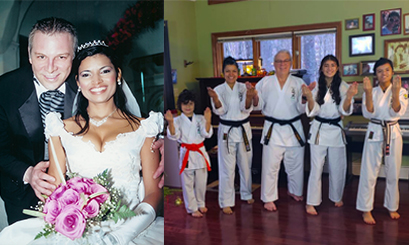
Married my dream girl, Tania, in 2008 and now
have my dream family. Still working on the castle.
Life is good!
  • A large ground mount Solar PV array
  • A small wind turbine (I own the top of the mountain and there is wind!)
  • Tesla Solar Roof tiles that generate electricity
  • A smart house with computer-controlled power systems
  • Tesla Powerwall battery storage
  • Enough capacity to power an electric car
  • Geothermal heating/cooling with radiant heat floors
  • Solar hot water heater to augment the geothermal
     Note: there will be a tree planting campaign in the future to offset the
     carbon footprint of the concrete and steel rebar in the castle.


Dream no small dreams for these have no power to move the hearts of men.
- Johann Wolfgang von Goethe


Construction Progress 2023

I built the 2nd floor deck in 2023.


After years of work, I achieved a major milestone in September. I had one goal in 2023: get the 2nd floor installed by December, and I finished months early. But now I'm having problems with my minions.


My old friend, reporter Sean Hurley, caught up with me for the first time in years. He produced a short 2-part Instagram
video about me and the castle:

Part 1:

 
Part 2:


Picking up where I left off after my hospitalization last year, I am continuing to install the floorboards over the timber. I got the rest of the deck for my 25' round living room put down in the beginning of May.

Construction Progress 2022

In August 2022, I lost my entire construction crew (me). I ended up bedridden in the hospital with a blood infection from a nick on my shin that got into my spine, causing excruciating pain. I finally got out in November 2022 and was walking with a walker. I had to relearn to walk and rebuild the 25 lbs. of muscle weight I had lost. So, that pretty much killed the rest of the 2022 build season, and I never got the second floor installed. By going to karate every day starting in January 2023 and working through the pain, I was able to rebuild my muscles, and I made a full recovery. In March of 2003, I even tested for my 3rd-degree blackbelt in Uechi Ryu Karate and passed. Hard to imagine accomplishing that when I was still walking with a walker in November!

In the ICU in Concord Hospital


I had a crew of carpenters help me cut and place the timber on top of the walls. Next, I will pin each timber to the wall, and then I can start laying down floorboards.

The placed timbers.

Castle Design

Keene Castle was designed by me, Lance Keene, using Home Designer Pro and was modeled after castles in Europe. Le Château de Vigny in France was my inspiration for the entrance. The rest came from studying how we as a family want to live & interact with the castle. From the book "The Not So Big House: A Blueprint for the Way We Really Live" I learned about flow and designing cozy spaces. Ok, I may have strayed from the "Not So Big" part but I tried to make it cozy. The design was also influenced by the contours of the cliff face. Frank Lloyd Wright believed in what he called "organic architecture". He thought that great architecture promotes harmony between design and nature. I will try to achieve that harmony with by using natural materials and landscaping that make the castle appear to be a natural extension of the cliff.  explore the design here

1st Floor Walls Concrete Pour on August 24, 2021

After a year and a half of work putting up the ICF walls, we finally poured concrete into them.

WMUR TV's Chronicle Segment on Keene Castle

WMUR Producer, Sean McDonald, interviewed me for this episode of Chronicle. I gave them 20 year worth of videos and images for the episode. They did a brilliant job of editing and were able to tell a complete story in only 3 minutes.


Construction Progress 2021


The bartizan is 7 ft. across and sticks out from the side of the castle wall. The floor of it will be 5" thick concrete. I calculate the wet concrete will weigh 2300 lbs. Therefore it needs a really strong platform to hold it until the concrete sets up.


Here I am building the triangular bartizan corbels that will support the bartizan floor.


This is the concrete petistal that will support the stone fireplace in the livingroom.


Jon placing verticle rebar in the spiral staircase turret.


I'm taking a break in the shade to have some lunch. It's always a struggle staying hydrated in the hot sun for 10 hours a day on the weekends.


Here I'm giving the new drone a try. Can you find me?


3 window frames placed in the home theatre.


Looking up at the home gym from the home theatre. Nice to see the gym walls finally up to height.


Putting the last course on the home gym walls.


Placing window frames in the home gym.

Construction Progress 2020


We made a vallient attempt to get all of the walls up before winter but didn't quite make it. This is as far as we got in Dec 2020.


My original dumptruck finally died and I bought this one for $2300. It lasted for 3 loads before the transmission went. I rolled it down hill until the transmission locked up and it wouldn't move. Unfortunately it had no emergency brakes so I got out and looked for rocks to put under the tires so it wouldn't roll away until my mechanic could pick it up. Then, like a scene in a comedy move, it rolled away and landed in this ditch. But I'm not going to cry over spilled dumptruck. Just need to get another old junker.


Here's my friend Daniel helping me brace the kitchen walls preparing for the winter winds. Apparently we did a terrible job because the winds totally distroyed the kitchen over the winter.


I picked up a new (used) dumptruck for $2300. Nice to be able to haul dirt again. This day we made a little flatspot to bring the grade up in front of a side door.


Just started putting in the window frames into the small stairwell turret.


Sunrise over the home theatre.


This was my biggest engineering mistake so far. I had my structural engineer design a breakfast nook that would stick out from the side of the castle. But as I was building it, I thought "wow, this is kind of small, I should make it bigger". Well, when the structural engineer saw my as-built drawings, he said "You changed my design! Now this column will fail and we need to do remediation." So he designed these steel corbles ($4000) and my welder did a great job fabricating them ($1000) and I had to buy some new tools to install them ($800). So, live and learn, don't ever change the structural engineer's design or it will cost you!


Got the back of the gym wall up here.


A little ray of sunshine as we were building the kitchen walls.


Under the kitchen I built these jigs to glue up the radius blocks. We have 4 different turret sizes but two of them, the theatre and the gym, are so close that I can use the same jig.


My attempts to seal the plywood floor with Liquid Rubber and another white roofing paint failed. It leaked like crazy. So I had to resort to putting down a real roofing membrane called EPDM. This floor is going to be exposed to the elements a few more years and I don't want this floor to rot before we get the roof on.


So cool to see the very first window placed!!!


This is what it looked like after all of the blasting was done. I couldn't put it off any longer. The blasting had to be done before the first floor walls went up.


Drone shot of blasting. Each one of those mats were 30 ft. long.


Every 20 years, the Town of Thornton paves my road up to my castle. And wouldn't you know it, they were paving the same day as I was taking delivery of a flatbed full of blocks. So we had to dump them in the valley below and I had to take them up to the castle a few at a time in my pickup.


Blasting in July 2020


Dynamite & amonium nitrate used by the blasting team.


Here's the blasting crew drilling holes for their explosives.  Be sure to see the blast video I shot with the drone.


Flyover in June 2020​


During bad weather, all I can do is move dirt. This is about 40 loads with my little 1 ton dump truck.

Construction Progress 2019

For 2019 we spent the whole season getting the first floor deck on. We first added ledger boards to the top of the foundation wall. Then we had to build concrete columns to support carrier beams that would support the floor joists. Then we added the subfloor and waterproofed it. As always, it took 3 times as long as I predicted and cost 3 times as much!


Under the kitchen Bill & I built a deck over the granite. This space is huge! My original plan was that it would be for storage but I may make it a guest bedroom.


This room will be my workshop where I keep all of my tools.

This room will be the home theatre. We'll have a projector in the ceiling and will project onto the wall so the whole wall will be our television.


Instead of cutting pockets in the concrete for the carrier beam I just added 2 more concrete columns close to each end.


We started waterproofing the deck. In most construction you try to get the roof on as fast as possible. I don't have that luxury so we have to waterproof everything.


This is the breakfast nook. It will give us great views into Franconia Notch while we are eating breakfast.


Nice to see the deck going on the dining room. The kitchen on the far end is almost done.


Since there are nail guns I had a theory that screw guns existed. I looked on Amazon and sure enough I found one. This thing was a huge time saver. It also saved our backs because you didn't have to bend over.


On this day we got the carrier beam built in the entrance.


I screwed up and didn't leave pockets for the carrier beams in the concrete last year. So I had to buy a concrete cutter with a diamond blade. This is the price one pays for being an amateur builder and not planning ahead. Live and learn. I'll definitely leave pockets for the beams in the top of the first floor walls in the 2020 build season.


Getting the columns poured and the carrier beam built took a lot of time. Nice to see floor joists finally going on.


Finally finished the floor of the home gym.


It took 2 and a half days to get the floor joists on the home gym. This was our first time putting in floor joists so it was a bit of a learning process.


Got the pockets cut, column poured, carrier beam built. Now ready for floor joists.


Here I'm leveling the bearing plate for the carrier beam on top of the concrete column we just poured.


Here I started attaching the ledger boards to the top of the foundation wall. The ledger will support the floor joists.


I had to build up 7 sheets of thin plywood to create a ledger board for the front turrets. That took a lot of glue and a lot of screws.


I leveled all of the ledger boards with my laser transit.

Foundation Pour October 12, 2018

After 18 years of working on the castle, it was incredible to see the foundation finally poured. After clicking on the arrow, click on the YouTube logo to restart in fullscreen.


Construction Progress 2018

I started placing the ICF blocks I made over the winter on the footings. It's starting to look like a castle! 


Progress Update 4/2/2018 - Making Radius Blocks


How We Use Girl Power At Keene Castle

Castle Construction Progress June/ July 2017

I'm currently working on the footings for the castle. Just a little bit more to go and I can move onto the foundation. That will be infinitely easier than the footings because I can use BuildBlock ICFs (Insulated Concrete Forms).


Marking the height of the footing with my laser transit.
 

Bending rebar for the footings


This is the form solution I came up with for building a footing on uneven granite. I drill holes to place rebar that holds the forms in place. Wire attaches the plywood to the rebar. The gaps under the plywood are filled with concrete which is left to dry before the footing is poured. Height of the footing is determined by the tape on the center rebar.
 

This day we poured 98 bags of concrete in about 7 hours.
 

I keep telling my wife that if she wants to help pour concrete, she really needs to wear appropriate footwear.


A freshly poured footing.


Footings after taking the plywood forms off.
 
The big room will be my workshop and the small one is a closet. The round turret on the right will be part of a huge closet.
 

Starting on the next section of footings: the round turret for the home gym.


I marked the footing for the corner of the kitchen onto the granite.
 

This project takes a lot of blood, sweat and tears. Some days, more blood than others. Cut myself on a sharp knife while sharpening a pencil.
 

Marking the footing with masking tape for the round stairwell.
 

The stairwell footing is now marked.


Just placed the rebar for the dining room wall.
 

Here you can see how far down we had to blast last year to get the stairwell footing where it needed to be.
 

I got the round turret for the family room marked on the granite.
 

The dump truck went into a ditch and I had to pull it out with the excavator.
 

Looking toward the dining room footing. I designed the castle around that glacial rock because I really like it. It's a piece of history.


Here the footing forms for the home gym are almost done.
 
The 2 round turrets on the left straddle the front door.


Excavator Accident April 2017

April 24, 2017

The 2017 build season started off with a bang! I was working a bit too close to the cliff, the excavator slid and went over with me in it. Almost killed me. I was stopped by a 6" tree right before going over a 200 ft. cliff. But I'm not deterred, I will persevere. Everything happens for a reason. This was my wakeup call, a reminder that I can't be doing stupid stuff up here on the cliffs that gets me injured or killed because I have a wife and kids. Now I pay a lot more attention to safety.

I contracted Rusty's Towing to pull my excavator back up on the cliff. They did a great job!


See 2 recent blasts


Construction Progress 2016

This is what I accomplished in the 2016 building season:

Finished filling the two terraces
Brought in more fill in front of the castle
Castle design mostly done
Septic design done
Got permits
All brush & dirt removed from the ledge where footings are going
Footing lines marked on the ledge
Blasting on the cliff for staircase
Footings finished for round entrance turrets & staircase turret
More brush removed from the parking area to prepare for blasting

Click on pictures to enlarge:


Satellite pic of the 1100' road I built. I learned a valuable lesson: don't tell road contractors you are building a castle or they will think you are some sort of nut case. After 5 of them blew me off I got so pissed off I bought a full size excavator and did it myself! Best decision I ever made because it saved me about $150K, was loads of fun and now I have an excavator which is a really handy tool to have in a project like this.


I bought a Phantom III Drone to take shots of the cliff.


In 2015 I moved the cabin to a different cliff because it was sitting right where the castle livingroom turret needs to be built.


I blasted in July '16 to make space for a stairwell on the lower level. See the blast video above.


It took me a lot of trial and error to come up with a system of forms that would work for around turret being built on a granite slope with the goal of reusing some of the form plywood. 


Rebar placed for the stairwell turret footing. This is an early shot and I was misreading my structural engineer's drawing. I was using 1/2" rebar epoxied 16" deep into the granite. The plan calls for 1" rebar so I had to go back and add more bar. 


The left entrance turret footing


The right entrance turret footing.   


Finished the '16 build season with 3 round turret footings done. These are the hardest of the footings.


2015 Construction Progress

Over Columbus Day weekend I finally backfilled the lower terrace. There was just no good way to do this so I resorted to sheer brute force and determination.  The only solution I could come up with was to fill the wheelbarrow with my excavator and fill the terrace one wheelbarrow load at a time!

Lance Keene
This is my John Deere 190. My wife refers to it as "the other woman."

Lance Keene

Lance Keene
Finally finished after 3 days of back breaking work. Every muscle in my body was sore. Thank God for Ibuprofen!

Select "Edit Content" from the Edit (Pencil Icon) Action Menu.   

What Celebs are saying about Keene Castle

Steve Wozniak, Co-founder of Apple Talking about Keene Castle

John de Lance, Star Trek actor Q & Climate Change Activist Talking about Keene Castle

Actor & Environmentalist Ed Begley, Jr. talking about Keene Castle

Brent Spiner, Mr. Data from Star Trek & Independence Day talking about Keene Castle & protecting the planet

Actor & Environmentalist Morgan Fairchild Talking about Keene Castle

Carolina Gaitán singing and talking about climate change & Keene Castle.

Actor Jack Coleman from Heroes and The Office talking about climate change & Keene Castle.

People I've Spoken to About Climate Change